

Computer Basics 1:
Windows Components
Table of Contents
| |
o Desktop
|
2
|
2
| |
3
| |
3
| |
o Taskbar
|
4
|
4
| |
4
| |
4
| |
5
| |
5
| |
5
| |
5
| |
5
| |
6
| |
6
| |
o Copy
|
6
|
o Cut
|
6
|
o Paste
|
7
|
7
| |
8
| |
8
| |
o Printing
|
9
|
9
| |
9
| |
10
| |
10
|
Desktop
The Desktop is the first screen that appears on your computer after Windows starts. There you will find the folders: My Computer, My Documents, the Recycle Bin and any Shortcuts for applications or files that you have created. From the Desktop you can also access the Start Button and the Taskbar.
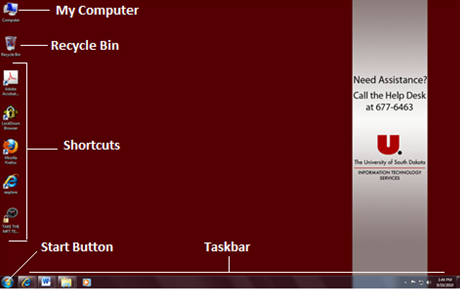
My Computer
When you double click on the My Computer icon on your desktop, it will open a window similar to the one shown below. Here you can navigate between the computer’s drives and the Control Panel tools. My Computer is useful for accessing documents or pictures saved on a flash drive or memory card.

Recycle Bin
When you delete a file from your computer's hard drive, it is removed to the folder called the Recycle Bin. Files deleted from your hard drive are still available for restoring if necessary, unless you empty your Recycle Bin. However, files deleted from a floppy disk or flash drive will be permanently deleted.
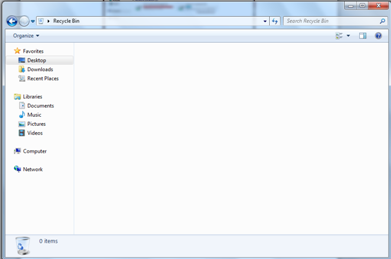
To restore a file:
1.Open the Recycle Bin folder by double-clicking the icon on your desktop.
2. Select the file or application you wish to restore
3. Right click and select Restore from the menu.
To clear the Recycle Bin, select “Empty Recycle Bin” and the files will be permanently removed from your computer.

Start Menu
By clicking the Start button, located in the bottom-left corner of your screen, a vertical window will open called the Start Menu. To access applications on your computer, select all programs and then open the application from the list. You may also search for an application, folder, file or document by typing the name of the search item into the search bar. The Start Menu also allows you turn off or restart your computer.
Taskbar
The Taskbar is a row at the bottom of your screen where all currently open applications or files are listed. The taskbar is used to select a file or application that is already open or to bring an application into the foreground. Windows 7 allows you to preview a file before opening it by holding your mouse over the icon of the application in the Taskbar.

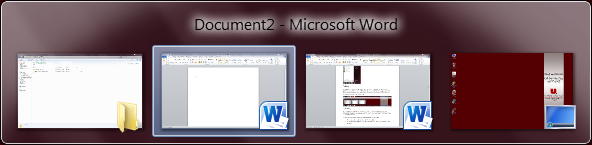
Multitasking
Working or running more than one application at a time is called multitasking. You can be more productive by multitasking. For instance, you can download files from the Internet while managing your files or word processing.
There are two ways to switch between multiple applications using the Taskbar:
1. Using your cursor, click on the icon or name of the application.
2. Using your keyboard, hold the ALT key and then press the TAB key to switch between all open applications.
Minimize, Maximize/Restore, and Close Buttons 
The Minimize, Maximize/Restore and Close buttons are located in the top right corner of an application screen.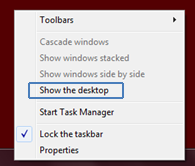
Minimize Button
Clicking the first button minimizes your application screen, sending it to the taskbar. To minimize all the applications currently open on your computer, right click the taskbar and select Show Desktop. Clicking this button will take you to the desktop and minimize all of your applications to the Taskbar.
Maximize/Restore Button
The second button maximizes your application screen, filling the entire desktop with the screen you are working on. If the screen is already maximized, clicking this button will restore your screen to a smaller window. While your application is in a smaller window, you may then move the application around your screen by the drag and drop method. You may also resize the screen by finding a corner and using the double arrow to make the screen larger or smaller.
Close Button
The last button will exit the application.
You may also access these commands by right-clicking on the icons for applications in your task bar and selecting the appropriate command. It is easiest to work with your document or application maximized.
Right and Left Click
To use the mouse, you usually click the left button. However you can also right-click to display a hidden menu related to the application open on your desktop. This menu can vary depending on which application you are using.
Right-clicking allows you to operate different functions such as:
1. Copy/cut or paste a text, file, or folder.
2. Create a new file or folder.
3. Rename or delete a file or folder.
Drag and Drop
The Drag and Drop method is used to move files from one location to another on your computer, usually in My Documents or My Computer. To drag, click and hold with the left button on your mouse. The file will then move along with your mouse. To drop, simply release the left button of your mouse at the desired location for your file.
Shortcuts
A shortcut creates a button or icon which typically stays on the desktop and when clicked, quickly allows you to start a program or open a file without having to go to its permanent location on your computer. To create a shortcut, go to the Start Menu, select the file or program. With your cursor, left click and hold on the icon or name of the file. Then Drag and Drop on to your desktop.
The shortcut file will be created on your desktop. Now, clicking on that icon on the desktop will take you directly to your application.
Highlight
Put your cursor at the beginning of a word or sentence you want to highlight, then click and drag your mouse to the end of the selection.

Copy, Cut and Paste Text
Copy
Copy is a great tool to place a duplicate selection of text within a document, or to replicate a selection of text in another document. Using the Copy tool will leave the original text behind, and place a duplicate of the text in your clipboard.
There are three ways to Copy text:
1. Highlight a selection of text and press CTRL+ C.
2. Highlight a selection and go to the Editor Home menu and select Copy.

Highlight a selection of text, right-click and select Copy, as shown in Figure 1 below.
Cut
The Cut tool can be used to delete a selection of text from a document or to move a selection of text to another location in that or another document. Using the Cut tool will remove the original text and place it in your clipboard.
There are three ways to Cut text:
1. Highlight a selection of text and press CTRL+ X.
2. Highlight a selection and go to the Edit or Home menu and select Cut.
3. Highlight a selection of text, right-click and select Cut.
Paste
The Paste tool is used in conjunction with the Copy and Cut tools to move selections of text around a document or application. Using the Paste tool will insert the last item moved to your clipboard to the location of your cursor.
There are three ways to Paste text:
1. Highlight a selection of text and press CTRL+ V.
2. Highlight a selection and go to the Edit or Home menu and select Paste.
3. Highlight a selection of text, right-click and select Paste.
Standard and Formatting Toolbars

Toolbars are rows of buttons and boxes that normally appear at the top of the window of an application. When you click on a button or box, an application opens or a task is performed. The Standard Toolbar shown in the image below is from Windows Explorer. This toolbar allows you to access File, Edit, View, Favorites, Tools and Help. The standard toolbars in other applications may have buttons that allow you to open a new document, save, print, and spell check.

The Formatting Toolbar is used to format a text using alignments, font type, font size, bold, italic, and lists. It is provided in most applications. The image below shows the Formatting Toolbar or Ribbon from Microsoft Word 2010.
Save and/or Save As
Save
Saving a document will create a copy of that document in a destination file on your computer. Clicking Save will overwrite the file you were previously working on in your computer.
There are multiple ways to access the save menu:
1. Using your cursor, select File and then select Save.
2. Using your keyboard, press CTRL+S.
3. Using your cursor, select the image of the floppy disk
Save as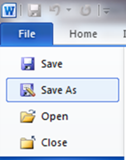
Save As is used to save a file with a different name to create backups of a file during the creation process. Utilizing this feature allows you to have different versions of the same document and return to a previous version of the document.
There are two ways to access the Save As feature:
1. Using your cursor, select File and then select Save As.
2. Using your keyboard, press the combination keys CTRL+SHIFT+S.
File Extensions
A file extension is the three letters of a file name after the dot. It is created by the application when you save a file. It is the way operation systems identify which application to use to open a file. Windows often doesn't list them when you are searching for a file, but they are there. Examples are: .txt, .doc, .exe, .html, .jpg, .gif, .wav.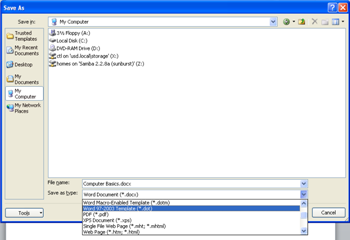
However, sometimes you will want to save a file with different extensions. In order to do that, select Save As in the File menu. The Save As box will open. Choose from the drop-down menu next to Save As Type the type you want to save. The extension of the type will be created for you by the application.
Here is an example of how to change file extensions from Microsoft Word:
Examples of file extensions:
· Graphic files: .bmp, .gif, .tif, .jpg
· Word document: .doc, .docx
· Program file: .exe
· Webpage files: .htm, .html
· Unformatted text: .txt
· Excel spreadsheet file: .xls
· Compressed file: .zip
· Rich Formatted Text: .rtf
· Sound file: .wav
· Acrobat Reader file: .pdf
Printing
There are two ways to access the printing menu:
1. Using your cursor, select File and then select Print.
2. On your keyboard, press CTRL+P.
Then you will be either taken to the printing menu or a pop-up will appear with printing options. You can select how many copies to print, to print a selection of pages, or to print the current page of your document. Other options like duplexing (double-sided printing) are also available depending on the printer.
New Folder
Folders can be used as a directory to store items of the same subject (i.e. documents or pictures) and organize files in your computer. A good place to practice this organization is in My Documents.
There are two ways to create a New Folder:
1. Go to the File menu, then select New and select Folder as shown in the figure below.
2. Right-click in the screen, select New and select Folder.
Your folder will automatically appear with the name New Folder. Highlight the text and change the name of the folder as it suits you.
Rename/Delete a Folder or File
Using Windows Explorer you can rename or delete a file or folder.
To Rename a file or folder:
1. Navigate and select the file or folder you want to rename.
2. Go to the File menu and select Rename, or right click and select Rename.
The file name will be highlighted and blinking in the right corner waiting for you to type the new file name.
To Delete a file or folder:
1. Select the file or folder you want to delete.
2. Go to the File menu and select Delete, or right click and select Delete.
Copy/Move Files
You can easily move a file around your computer using either the Copy/Move File function. This allows you to organize your files more effectively, or to move pictures, files or music from a USD Drive or a Floppy Disk onto your computer. Moving a File will transfer the file and its content to the new location, while Copying a File allows you to put the contents of the file in a new location as well as keeping them in the current location.
To move files, you must first access your file via the Start Menu or My Computer. You may use the Search Feature in the Start Menu to help you. One you have located the file, select or highlight the file. From here, you can either Copy or Move the File.
There are multiple ways to access these features.
1. While the file is highlighted, go to Edit and select Copy File or Move File. In the screen that pops up select the new location for your file and then with your cursor press the Copy or Move button.
2. You may also select Copy File or Move File from the pane on the left side of the screen.
3. You can also use the Copy/Cut/Paste Tools to manually move a file by right clicking on the highlighted file. Then select Copy or Cut. Now go the location that you wish to move the file to on your computer. Once there, right click and select Paste.
The same procedure can be used to move an entire Folder.
Hard Drive and the USB Flash Drive
In your computer there are different drives: the hard drive, the floppy drive and the compact disk or DVD drive.
The hard drive, also called the C: drive, is used for storing all your applications and files and is internal storage. The floppy drive, or A: drive, is used when you insert a floppy disk to store files that you want to transport or create a backup. Most computers now use a device called a USB Flash Drive to serve the same function as a Floppy Disk. Flash drives can be inserted into a USB port and will then be accessible through my computer. The DVD drive or D: drive, will be used when you insert a DVD or CD into your computer.
source: https://docs.google.com/document/d/1MDJg6R4GeXodFqgZSFyF1LBnlCqiHWOHDYIL5mytz18/edit
No comments:
Post a Comment
Remember what peace there maybe in silence ;)