Computer Basics II
Properties and Accessories
Table of Contents
|
|
|
|
2
|
|
|
2
|
|
|
3
|
|
|
3
|
|
|
3
|
|
|
4
|
|
|
5
|
|
|
6
|
|
|
6
|
|
|
6
|
|
|
7
|
|
|
8
|
|
|
8
|
|
|
9
|
|
|
10
|
|
|
10
|
|
|
10
|
|
|
11
|
|
|
12
|
System Properties
System Properties displays the operating components of your computer. This menu is useful for checking the system requirements needed to run an application against your own device components. There are several tabs within System Properties that perform various functions. The general tab gives you information about your computer, your memory storage and video cards. Computer Name allows you to assign a name to your computer to make it identifiable on a network. The Hardware Tab allows you to view devices and drivers installed on your computer. The Advanced Tab lets you choose options for Performance, User Profiles and Startup and Recovery.
To see the properties of your computer:
1. Right-click on the My Computer icon on the desktop.
2. A short cut menu will appear. Click on Properties.
3. The System Properties Window will then appear in your screen. From there you may navigate to the other tabs.
Control Panel
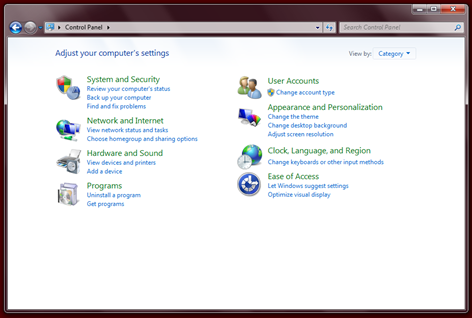
The Control Panel, shown below, gives you access to various menus that let you customize your computer to fit your needs. Within the Control Panel, there are various categories that group settings by topic to make them easier to access. There are several ways to access the Control Panel:
1. Using your cursor, click on the Start Menu. On the right side of the menu, underneath your username, highlight and click on “Control Panel.”
2. Using the search feature of the Start Menu, search for “Control Panel” and select it from the list.
Appearance and Personalization
Clicking on the appearance and personalization icon on the Control Panel will lead you to the screen located to your right. The Appearance and Personalization Category offers many of the options essential to personally customizing your computer. In this category, you may personalize your desktop theme, background wallpaper, sound effects and your screen saver.
Theme
“Theme” refers to the overall look of your desktop and includes the Windows Welcome Screen, your wallpaper, your taskbar and the color and style of windows that open on your computer. You may choose a theme from the themes that come standard with a Windows 7 to change all of these items at once, or tweak and customize each item individually to suit your personal needs.
Wallpaper
Wallpaper refers to the background picture that appears on your desktop. This feature is customizable on every computer. You may choose from a variety of pictures that come standard on your computer, or you may use a personal photo from your picture library or the internet as wallpaper. You may also choose to make the desktop a solid color.
There are multiple ways to change the Wallpaper of your computer:
Right Click on an open area of the desktop. From the menu select personalize. The personalization screen will open on your screen with the theme tab open. At the bottom of this window, select Desktop Background. When you select a photo or background or color, the computer screen within the Properties Window will preview your selection. You may preview how the selection will look on your entire desktop by selecting the Apply button at the bottom of the window. You may also change the position of the background or picture on your computer. The “Stretch” option will make your picture fill all of the available space. “Center” will put a smaller version of your photo in the middle of your desktop with a solid color filling the rest of the screen. “Tile” will fill your screen with multiple copies of your photo.
You may choose your Wallpaper from three different sources:
To select a standard Windows Wallpaper, simply select one from the list in the Background Box in the Desktop Tab.
To select a picture from your personal photo library, use the Browse feature to locate the file you wish to use and select it.
You may also choose a solid color for your desktop by utilizing the drop down menu under color on the Desktop Tab. You may choose an existing color or you may edit the colors to create a Custom Color. Storing a color under Custom Colors will allow you to use the same color in the future.
Once you have chosen your wallpaper, click okay to save the appearance and exit to your desktop.
The internet may also be used as a source for your Wallpaper. Using the internet and your cursor, right-click on a picture. From the menu, select “Set As Background.” Upon returning to your desktop, your wallpaper will be changed.
The Control Panel will also allow you to access this feature.. Once in the Control Panel, click on the Appearance and Themes Icon. Next pick “Change the Desktop Background.” This will take you to the personalization screen where you can again follow the directions given in step one to personalize your background.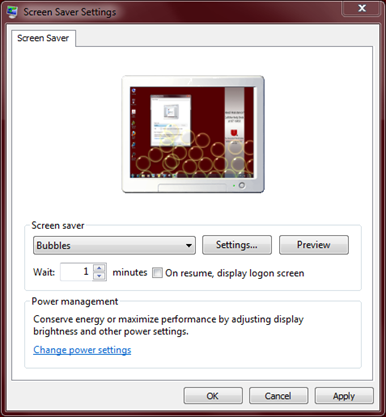
Screen Saver
From the Control Panel and the Appearance and Personalization Category, you may access the Screen Saver Settings Menu shown on the right. The screensaver puts your computer into a lower power state after your desktop, cursor and keyboard have been inactive for a specified amount of time. There are several different options for customizing your screensaver.
You do this by choosing an option from the dropdown menu. In the image to the right, it is currently set to the “Bubbles” Screen Saver. This screen saver is then previewed in the miniature screen.
Other options for your screen saver include:
· 3-D Text
· Mystify
· Ribbon
· Pictures
· Windows Live Photo Gallery
Of these options, 3-D Text, Pictures and Windows Live Photo Gallery are customizable. To customize these options, select the option from the drop-down menu and then click on the “Settings…” button to open the Settings Menu. You may change the text and font in 3-D text. In the Pictures setting, you may choose a specific file to retrieve pictures from and to shuffle or randomize the order of your pictures. Using Windows Live Photo Gallery Settings allows you to further customize which pictures are displayed in your screensaver through the Tag and Rating features of Windows Live Photo Gallery.
You may also customize the amount of time that your computer waits to start the screensaver. This feature is accessible right below the drop down menu in the box labeled “Wait”. We recommend setting your wait time to at least 5 minutes. For added security, you can set your computer to return to the log on screen after your screen saver has been used by checking the box next to the Wait box.
Date and Time
Date and time are shown in the bottom right corner of your taskbar. Clicking on the date and time will open a clock and monthly calendar. Unlike cell phones, computers do not automatically change time zones when they are moved and opened in a different location. However, this feature is customizable on Windows Computers. There are two ways to change the date and time:
Using your cursor, click on the Date and Time to see the clock and calendar, then click on “Change date and time settings…” highlighted in blue at the bottom of that window. This will open the Date and Time Menu.
From the Control Panel, select the Clock, Language and Region settings, and then choose the Date and Time icon.
To change the time zone, select the “Change time zone…” button. You may also click the “Change date and time…” button to manually set the date and time if it is incorrect.
Volume 
On a desktop, volume can be controlled usually be controlled just using your external speakers; however, Windows also lets you control the output of volume from your desktop.
To access the sound feature, find the loudspeaker icon in the bottom right corner of your taskbar next to the date and time. Clicking on this icon will allow you to adjust the volume projected from your computer or mute the sound. Clicking the “Mixer” option on the bottom of that menu allows you to adjust the sound for individual applications by opening a screen similar to the one on the right. This menu is also available from the Control Panel by clicking on the Hardware and Sound category, and then choosing “Adjust System Volume.”
Accessories
Games
Several games come standard on Windows Computers including FreeCell, Hearts, Minesweeper, Solitaire and Spider Solitaire.
Using the Start Menu, either search for Games or find it in the “All Programs” tab. From here you may access any of the games listed.
Calculator 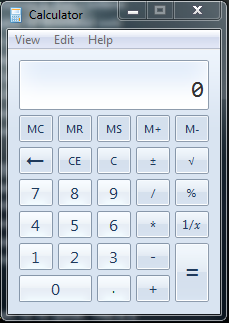
The calculator allows you to perform simple math functions on your computer. To find the Calculator:
Using the search feature found in the Start Menu, search for “Calculator.”
Using the Start Menu, go to “All Programs,” and choose “Accessories” and then choose Calculator.
The Calculator will open in a new window in your Start Menu. The standard view of the Calculator, shown on the right, will allow you to perform basic functions such as addition, subtraction, multiplication and division. Additionally, the standard menu will allow you to find percentages and square roots. You may change the view of your calculator to “Scientific” to add more options for functionality. In the scientific view, shown below, you may access math functions such as sine, cosine, tangent, log and natural log, and exponential features. You now also have access to the value of pi and may use parentheses for more complicated problems. To clear the data on the screen of your calculator, press the “C” button.
Windows Live Photo Gallery 
Organizing Photos
Windows Live Photo Gallery allows you to sort picture files from your computer using several different features. All photos from your computer are accessible in Windows Live Photo Gallery through the files located on the left hand side navigation panel. The navigation panel for organizing photos should look similar to the image on the right. However, you may also view photos by date or by people and descriptive tags:
By Date:
To view pictures by date, locate the calendar icon in the left panel of window. Expanding the icon will give you a list of years to choose from. Expanding a year will then give you a list of months, and expanding a month will give you a selection of days from which to view pictures. Note, that pictures will only have a date associated with them if the digital camera that they were taken with was set to the proper date. To utilize this feature, you may have to manually enter the date the picture was taken into your picture info.
2. By People Tag: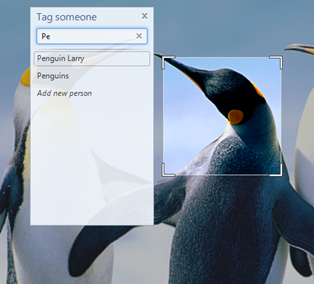
Windows Live Photo Gallery allows you to identify individual people in your photos through the tagging feature. To tag a person, open the photo by double clicking, and then click “Tag Someone” on the right panel of the screen. Your mouse will then turn into a box tool that you may use to fame the face of the people in your photograph, as shown in the photograph on the right. Then you may either create a new tag, or choose from an existing people tag. Windows Live Media Gallery will then compile all the pictures tagged with that people tag together on the left panel of the viewing screen. Sorting using this tool is useful for singling out all the pictures containing an individual.
3. By Descriptive Tag:
Descriptive tags work similar to the people tag feature; however, now you may categorize your photos using broad descriptions. For example, if you have several files featuring photos from different scenic areas but you would like to view them all together, you could create a photo tag labeled “Nature” or “Scenery” and then tag all the photos that fit into that category, allowing you to view them together. You may add more than one tag to a photo. To tag a photo with a descriptive tag, first open the photo by double clicking. Then click “Add Descriptive Tag,” where you can either create a new tag or choose an existing tag.
Editing a Picture
Windows Live Photo Gallery allows you customize your photos through editing. There are several editing features. To edit an individual photo, first open the photo by double clicking on it.
There are several photo options available in this pane:
You may add a caption to your photo using the navigation pane on the right hand of the screen. Captions are often used to describe the event taking place in the photo.
You may also rate a photo using a star system underneath the information heading in the right hand navigation pane. Rating photos allows you to then sort photos with higher rated items first. You may also use this sort feature in your screen saver options.
By clicking “Fix” from the upper navigation ribbon, you will change the options available on the right hand navigation pane. You will now be able to perform basic editing:
Clicking “Auto Adjust” will allow Windows to automatically adjust the photo color, exposure and straighten settings to an optimal value. You may also individually edit these setting by click on them and moving the values up or down as you prefer.
Cropping a photo allows you to select a smaller portion of the image. The crop tool creates an adjustable box. However, you may select a box size from the drop down menu to keep your photo in proportion to the size that you might later wish to print them in.
If the people in your photos have red eyes, you make fix their eyes using the “Fix Red Eye” tool. This tool will prompt you to select all the “red” eyes in the picture.
“Black and White Effects” allows you to change the filter on your photograph, by selecting one of the available options.
At the bottom of the screen, two arrows allow you to rotate your photo clockwise or counterclockwise.
You may undo any changes you make by clicking the undo button at the bottom of the screen. By clicking the arrow to access the drop down menu, you may undo all changes to the photo or revert the photo back to its original style.
Internet
Using Tabs
The internet now has tabbed browsing, which allows you to open multiple webpages within the same internet browser and switch between them using the tab feature. Several tabs are shown in the photo below.To open a new tab, click on the blank tab. Within the blank tab, you may navigate to a webpage by using your stored Favorites or by entering an IP Address within the address bar. To switch between open tabs, simply click on the tab that you wish to have at the forefront of your screen. To close a tab, click on the “X” located next to the title of that tab. Exiting Internet Explorer will close all tabs.
Creating a Homepage
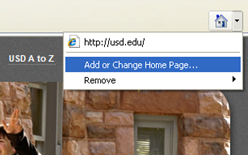
Homepage is the term that refers to the website that automatically appears when you first open your internet browser. To add or change your homepage, first open the website on your internet browser. Next, locate the homepage icon that looks like a house in the upper right hand corner of your screen. Use the arrow to access the drop down menu and select “Add or Change Homepage…” as shown below. A box will open in your screen to give you several options, such as making this page your only homepage or to create more than one homepage by adding this page as a homepage tab.
Favorites Menu
The internet allows you to s
tore webpages that you visit often by using the Favorites feature of Internet Explorer. The favorites menu is accessible in your internet browser on the left side of the top ribbon. To extend the Favorites Menu, click on the Favorites button. To follow a website on your Favorite’s Menu, simply click on the name of the page and the internet browser will go the page saved in the Favorites Menu.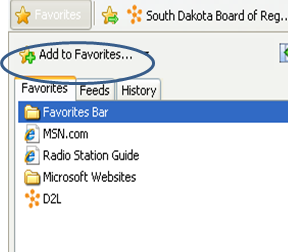
To add websites to the Favorites Menu, first visit the website or page that you wish to add. While you are on the page, open the Favorites Menu and select the “Add to Favorites…” button at the top of the menu. A new window will appear on your screen, prompting you to specify a name for the Webpage and select a location in your Favorites Menu for the file. After making your selection, click the add button to insert the item into the Favorites menu.
You may organize your Favorites Menu using folders to group websites of a similar topic together. To access this option, open the Favorites Menu, then next to the “Add to Favorites…” button; select the arrow for the drop down tab. From the options, select “Organize Favorites…” A new window shown on the left will appear on the screen allowing you to Rename, Delete or Create New Files. You may drag and drop items into files or use the move feature.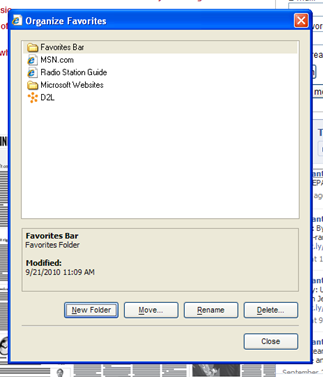
If you would like the Favorites Menu to be visible on your screen as you move around the internet, you may pin the Favorites Menu to the side of your screen by selecting the green arrow facing outward. To unpin the Favorites Menu, select the “X” button.
Favorites Bar
The Favorites Bar is similar to the Favorites Menu, in that it allows you to easily access stored web addresses. However, the Favorites Bar is part of the Internet Explorer Ribbon and does not have to be accessed through the Favorites Menu. The Favorites Bar is a great place to store websites that you visit the most often, like an e-mail provider, search engine, social networking sites or a news media source.
To add an item to the Favorites Bar, simply visit the page you wish to add and click the star with the green arrow located next to the Favorites button in the top right hand corner of your screen as shown below. The website will then appear in the bar next to this star. You may also access the items in your Favorites Bar through the Favorites Menu in a folder called “Favorites Bar.”
source: https://docs.google.com/document/d/1IALJbma8chclU9vIfcUTRpMTGt7PRPblye7uNsupeS8/edit